

2024-01-25
EngineeringLoad Balancing Data Ingest With Cloudflare Workers
Building an analytics service means ingesting large amounts of data with unpredictable traffic patterns. When your service enables metrics & alerting, being able to do this reliably is crucial.
In this post, we’ll show how we setup the ingestion architecture for Aggregations.io to handle the challenges of analytics workloads, while also optimizing for cost, reliability and performance.
Cost vs Reliability
This balance is tricky and companies approach it in different ways, depending on a multitude of factors. But you can boil it down to a simple 2x2 decision grid.
| All the 9s | “We were only down for an hour” | |
|---|---|---|
| Money is no object | Easiest to achieve. Overscale your systems with dedicated SREs and super sensitive auto-scaling. | Nobody wants this. Many achieve it accidentally. |
| Pinch every penny | The goal | Lower costs, accepting risk. Ride the edge of CPU limits, utilize a single availability zone, human error / deploys may bring down the system. |
Of course this demonstrates some extremes, and everything is a spectrum; because Aggregations.io is a bootstrapped company, we are always cognizant of costs, but will not compromise on the quality and reliability of the product.
For a while now, usage-based and “serverless” architectures have been touted as the best way to achieve this balance. But they’ve been plagued with cold-start performance issues, higher costs (at scale) and technical limitations integrating with downstream services (databases).
But in the last couple years, a new type of serverless has arrived, edge functions which run in a more restricted environment, while continue to offer more and more functionality with lower and lower costs.
Our ingest layer runs atop Cloudflare Workers. The current cost structure for paid Cloudflare workers (not accounting for the 10M included requests & 30M CPU ms).
- $0.30 per million requests
- $0.02 per million CPU ms.
If we’re doing our job right, the overhead here from a CPU ms perspective is meaningless - most of the time the worker won’t need to ingest data, so its time spent doing CPU work will be less than 1ms. When it does, the actual CPU time for the ingestion parsing & decision making is ~5-10ms. The overhead of 30 cents per million requests is totally acceptable for us, because it is providing the necessary “overflow” support needed when the API is saturated - and means we can run a more conservatively scaled API fleet behind the scenes.
Ingesting data
First, it’s important to understand what generally needs to occur in order to ingest data:
Validate API Key
Retrieve Ingest
Validate Payload
Verify Limits
Enqueue Data
More specifically that means:
- Validate API Key
- Extract API key from request, hash it, compare the hashed key to the database, ensuring it is valid, enabled and has WRITE permissions.
- Retrieve Ingest Parameters
- Decode the provided Ingest ID, retrieve the details from the database, making sure it belongs to the same organization as the API key.
- Validate Payload
- Depending on the ingestion details from (2), we may need to extract the actual data from the request body or parse NDJson lines to JSON objects and of course, make sure everything is valid JSON. We also have certain limits on size & number of events - those need to be checked as well.
- Verify Account Limits
- Make sure the organization’s usage has not exceeded their selected plan (or ensure that overages are enabled).
- Enqueue Data For Processing
- Send the data to our Kafka provider.
How it works
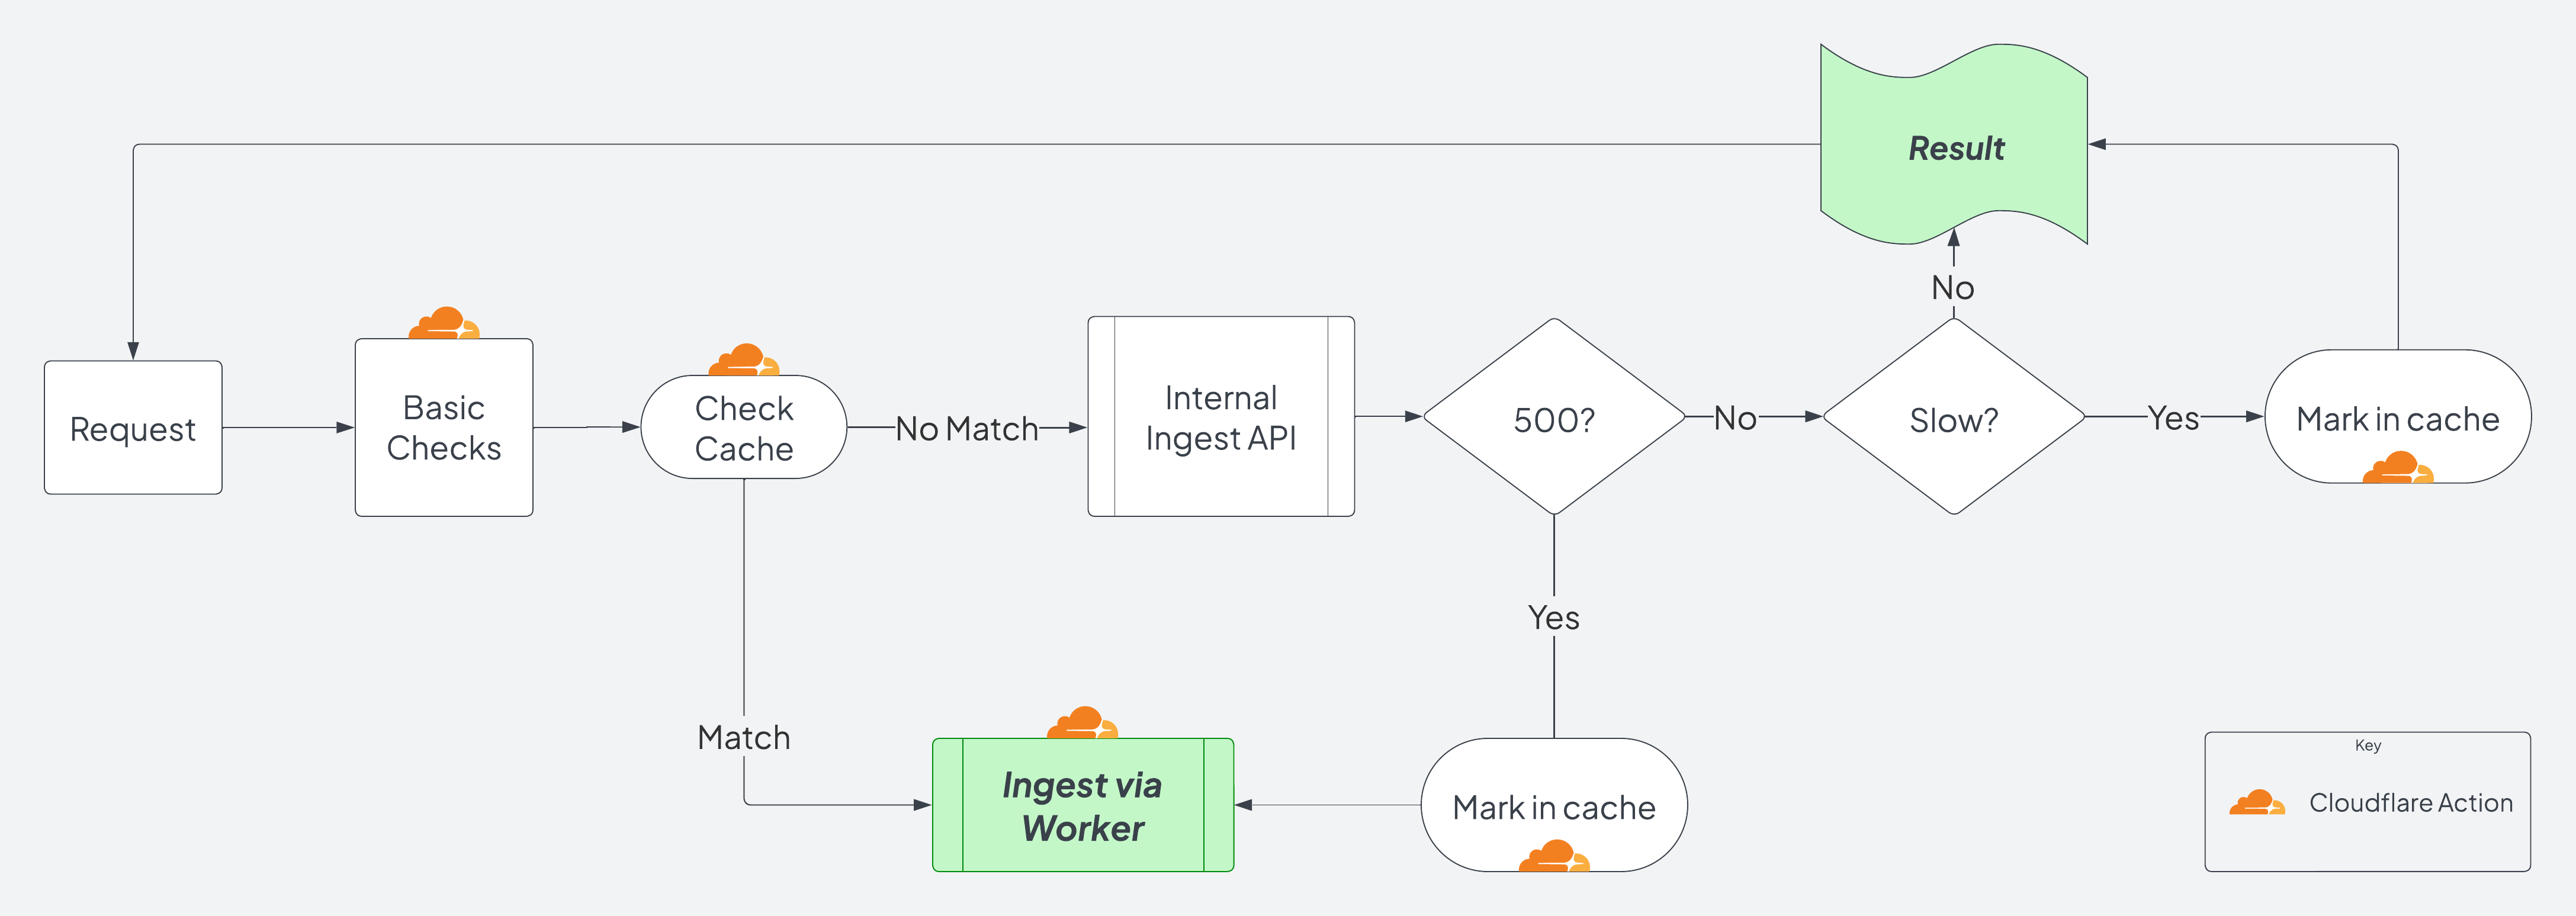
Workers enables us to inspect the request payload and decide whether to forward it on to our API servers or handle the ingest directly within the worker. This means that if we detect the API is saturated, the worker can be our “load balanced” target to ingest the data itself, as the API scales up and/or the traffic spike ceases. Here’s a high level view of that decision process:
Some worker pseudo-code:
async fetch( request: Request, env: Env, ctx: ExecutionContext ): Promise<Response> {

  if ( request.method != 'POST' ) {
    return new Response( null, {
      status: 405
    } );
  }

  // Because API Keys can be found in different headers (depending on the integration) we pull out the header to use first
  let api_header = request.headers.get( 'x-api-token' );

  // Kinesis requires a particular return format, so we handle that by extracting the return value early and wrapping all actual returns in a MakeKinesisReturn function
  const kinesis_request_header = request.headers.get( 'X-Amz-Firehose-Request-Id' );
  let is_kinesis = false;


  if ( api_header === null ) {
    api_header = request.headers.get( 'X-Amz-Firehose-Access-Key' );
    is_kinesis = api_header !== null && kinesis_request_header !== null;
  }

  if ( api_header === null ) {
    api_header = await GetHeaderFromBasicAuth( request );
  }

  if ( api_header === null ) {
    return new Response( null, {
      status: 401
    } );
  }

  // Here we utilize Cloudflare's cache to check a fake URL that may be cached previously, indicating that the API is saturated.

  let cache = caches.default;

  const checked_api_health_url = `https://fake-cache-checker.${env.ENV_NAME}.aggregations.io`;

  const checked_api_health_result = await cache.match( checked_api_health_url );


  // If something is found to match the cache, that means a previous request has indicated the API health may be having issues, and we want to use the worker. Otherwise, hit the API.

  if ( !checked_api_health_result ) {

    ~~~Modify Request, Hit API, Cache & Return if not 500.~~~

  }

  ~~~Perform Ingest directly within the worker~~~
}
You can already start to see the power that Cloudflare Workers offers, and we haven’t even gotten to the real magic. We’re able to handle integration-specific needs like Kinesis’s HTTP requirements within the worker, keeping the API logic simple and fast. We can support various authentication methods and reject requests early.
This is also where we create our own cached responses, and define custom logic on how to handle slowdowns or failures.
Here’s what happens inside of ~~~ Modify Request, Hit API, Cache & Return if not 500. ~~~
let replaced_url = new URL( request.url );
//We actually want to hit the API endpoint so we manipulate the URL a bit.
replaced_url.host = replaced_url.host.replace( 'ingest.', 'app.' );

replaced_url.pathname = `[direct API path]/${replaced_url.pathname}`;

const modified = new Request( replaced_url.toString(), request );

const start_api = performance.now();

let api_resp = await fetch( modified );

const done_api = performance.now();

const too_long = ( done_api - start_api ) > 1000;

if ( api_resp.status > 499 || too_long ) {

  // Either the API returned a 500+ or took too long (indicating saturation). So we need to craft a new fake Response to store in the cache for future worker requests.
  let bad_cache_resp = new Response( 'BAD', {} );

  // Set the cache to expire after 40-60s
  bad_cache_resp.headers.set( 'Cache-Control', `s-maxage=${getRandomInt(40,60)}` );

  ctx.waitUntil( cache.put( checked_api_health_url, bad_cache_resp.clone() ) );

  if ( api_resp.status < 500 ) {
    return await MakeKinesisReturn( is_kinesis, kinesis_request_header, resp );
  }

} else {
  return await MakeKinesisReturn( is_kinesis, kinesis_request_header, resp );
}
The Worker Path
-
If the API returns a response code below 500, that is expected and it is returned to the caller.
- If the API takes too long or returns a 500+, we cache that for 40-60 seconds (randomly).
- This cache is per Cloudflare datacenter, which are all over the world and therefore will not cause a consistent stampede on the API.
- In the future we might implement some additional randomness to fade-out requests to the API that are “slow.”
- If it is “slow” but an expected status code, we’ll return to the client.
- With a 500+ code, something has gone awry and we move on to the
~~~ Perform Ingest directly within the worker ~~~code path.
Database Operations
Recalling our five steps above, there are a couple database operations that need to occur. Until recently, this hasn’t been a realistic option “from the edge.” For Aggregations.io, we utilize PlanetScale for metadata & user data storage. PlanetScale is our preferred hosted MySQL provider. We won’t dive into all their great features, but one important attribute is their ability to handle high connection counts as well as their native Cloudflare Worker driver. Within our API layer we utilize an ORM for strong mapping of code to database entities, since we run only a single direct query from the worker, it is written in hand-crafted, artisinal SQL.
We don’t want to hammer PlanetScale too hard, so we again utilize the Cloudflare cache to check if we’ve recently (in the last 30s) made this query. This also affords us a boost in speed, as it shaves a few ms off, making less DB requests.
The code looks like this:
const check_db_cache_key = `https://ingest-db-check.${env.ENV_NAME}.aggregations.io/api_${api_header}_${ingest_id}`;

const check_db_cache_result = await cache.match( check_db_cache_key );

let parsed_db_res = [];

if ( check_db_cache_result == undefined ) {

  ~~~RUN QUERY AND CACHE~~~

} else {
  parsed_db_res = JSON.parse( await check_db_cache_result.text() );
}

if ( parsed_db_res.length > 0 && parsed_db_res[0].enabled == 1 && parsed_db_res[0].permissions.indexOf(1) > -1 ) {

  ~~~API Key is valid, enabled & has permissions.~~~

} else {
  return MakeKinesisError( is_kinesis, kinesis_request_header, 'Unauthorized or Invalid API Key', 401 );
}
If the cache check doesn’t return anything, we move into the ~~~ RUN QUERY AND CACHE ~~~ code path.
The first step is to hash the user-provided API Key, since we do not store the actual key, just a hash.
We then need to decode the Ingest Id provided in the URL, because we utilize hashids to provide some level of obfuscation to all identifiers returned from the API and UI. Cloudflare Workers can run most JS code & libraries, so we’re able to simply utilize the hashids library.
const hashids = new Hashids( env.HASHID_SALT, 10 );

const hashed_key = await hash( api_header );

const hashids = new Hashids( env.HASHID_SALT, 10 );

if ( !hashids.isValidId( ingest_id_hash ) ) {
  return MakeKinesisError( is_kinesis, kinesis_request_header, 'Invalid Ingest Id', 400 );
}

const ingest_id_decoded = hashids.decode( ingest_id_hash )[ 0 ];

// Set up the DB Connection, using secrets stored in the ENV object. We want to control the caching, so when it performs a fetch, we want to delete the initial cache properties.
const db_config: Config = {
  host: env.DATABASE_HOST,
  username: env.DATABASE_USERNAME,
  password: env.DATABASE_PASSWORD,
  fetch: ( url, init ) => {
    delete init.cache;
    return fetch( url, init );
  }
}

const conn = connect( db_config );


const query = `
SELECT a.enabled,
       a.permissions,
       i.*
FROM   api_keys a
       JOIN ingests i
         ON a.organization_id = i.organization_id
WHERE  a.hashed_pass = ?
       AND i.id = ?
       AND i.is_deleted = 0
       AND a.is_deleted = 0
LIMIT  1;
`;

// Execute our query, and use the hashed_key and decoded ingest id as the parameters.
const db_res = conn.execute( query, hashed_key, ingest_id_decoded );

const db_res_json = JSON.stringify( db_res.rows );

let db_res_to_cache = new Response( db_res_json );

db_res_to_cache.headers.set( 'Cache-Control', "s-maxage=30" );

db_res_to_cache.headers.delete( 'Set-Cookie' );

ctx.waitUntil( cache.put( cache_key, db_res_to_cache.clone() ) );

parsed_db_res = db_res.rows;
Assuming the parsed_db_res has a valid Ingest, we move into the ~~~ API Key is valid, enabled & has permissions. ~~~ code path, where we will now tackle steps 3,4 & 5 of our process.
(3) Validating Payload
We’ve got our Ingest, identifying which event format the customer selected, and we compare that to the body of the request. We also keep track of the approximate JSON size and the number of events. No matter the chosen format, we want to end up with an array of JSON strings to enqueue. We have a function that has the following signature:
async function ParseBodyToEvents(
    request: Request,
    is_kinesis: boolean,
    env: Env,
    schema_type: number,
    records_key: string | null
    ): Promise <[Response?, number?, string[][]?, number[]?, number?]>
The response is a promise consisting of:
- A response, in the case of an error parsing, we can construct our response and bubble it up.
- The event count
- An array of array of strings,
dataswhere each array consists of a batch, ensuring the enqueued payload won’t be too large. - An array of numbers,
sizesthat tracks the corresponding byte sizes in thedatasarray. - The overall size of the request
We ensure the sizes and event count are all valid and move on to step 4, verifying account limits.
(4) Verifying Account Limits
For account limits, we follow a similar strategy to database retrieval, but we need to hit our API to determine account limits.
You might ask yourself, wasn’t the whole point of this to operate purely on the worker, and decouple from the API? The answer is yes, but the account limits service can run separately from the ingestion service, and is very efficient. It also relies on Redis, which isn’t directly addressable from our worker.
There are workarounds to this, but because this isn’t a critical codepath, it “fails open” and if there’s trouble in the API - we don’t mind ingesting extra events.
Additionally, once an account is over its limit, we utilize the same style of caching within the Worker to ensure we don’t bother the API with unnecessary requests.
async function CheckLimit(
    request: Request,
    api_header: string,
    organization_id: number,
    event_count: number,
    ctx: ExecutionContext
    ): Promise<LimitCheckResult> {

  try {
    const limit_check_cache_key = `https://limit-check-${env.ENV_NAME}.aggregations.io/org${organization_id}`;

    const limit_check_req_init: RequestInit < CfProperties > = {
      cf: {
        cacheTtl: 10
      }
    };

    const limit_check_request = new Request( limit_check_cache_key, limit_check_req_init );

    const limit_check_res = await cache.match( limit_check_request );

    // Not found in cache, need to call the API
    if ( limit_check_res === undefined ) {

      // Craft our api limit check request, passing in the API header only
      const api_limit_check_init: RequestInit < CfProperties > = {
        headers: {
          "content-type": "application/json;charset=UTF-8",
          "x-api-token": api_header
        },
      };

      const api_limit_check_url = `https://app.aggregations.io/api/v1/auth-check/${event_count.toFixed(0)}?cf=1`;

      const api_limit_check_request = new Request( api_limit_check_url, api_limit_check_init );

      const api_limit_check_result = await fetch( api_limit_check_request );

      const api_limit_check_res_json = await api_limit_check_result.json();

      const return_item = new LimitCheckResult( api_limit_check_result.status, api_limit_check_res_json );

      let cached_api_check_res = new Response( JSON.stringify( return_item ), api_limit_check_result );

      cached_api_check_res.headers.set( 'Cache-Control', "s-maxage=10" );
      cached_api_check_res.headers.delete( 'Set-Cookie' );

      ctx.waitUntil( cache.put( limit_check_cache_key, cached_api_check_res ) );

      return return_item;

    } else {
      let from_cache_return_item: LimitCheckResult = await limit_check_res.json();
      return from_cache_return_item;
    }
  } catch ( e ) {
    // Failing open, just to be safe.
    return new LimitCheckResult( 200, {} );
  }
}
Assuming our LimitCheckResult has a 200 status, we move on to actually ingest our data!
(5) Enqueue Data For Processing
Kafka is the de-facto standard in data processing pipelines, with Confluent Cloud being a popular provider of managed Kafka services. However, it’s quite expensive, especially for smaller workloads. In our case, until Aggregations.io grows, we’re a smaller workload. We wanted a provider whose scalability could grow, but also whose costs made sense for our staging environment, as well as our early days in Production.
One of the key pieces to this load-balanced/dual-stack approach was the ability to ingest data via a REST API (or similar, non-long-lived connection). Confluent and other managed kafka providers offer this, usually at an additional and large cost.
Azure Event Hubs.
Event hubs offers Kafka protocol compatibility, which is all we need, especially to maintain interoperability with processing services and the ability to swap out the pipes in the future. Additionally, their scaling matches the defined needs, and beyond the basic tier, enables ingest via POST requests.
To enqueue data to Event Hubs we first need to generate an auth token, the Event Hubs URI, name & key are stored in the ENV secrets, and the code looks like this (adapted from here):
async function createEventHubsToken(
    uri: string,
    name: string,
    key: string
    ): Promise<[boolean, string]> {
  if ( !uri || !name || !key ) {
    return [ false, 'Missing Required Item' ];
  }
  const encoded_uri = encodeURIComponent( uri );
  const ttl = Math.round( Date.now() / 1000 ) + 3600;
  const signature = encoded_uri + '\n' + ttl;
  const encoder = new TextEncoder();
  const data = encoder.encode( signature );
  const calculated_key = await crypto.subtle.importKey(
    'raw',
    encoder.encode( key ), {
      name: 'HMAC',
      hash: 'SHA-256'
    },
    false,
    [ 'sign' ]
  );
  const signature_bytes = await crypto.subtle.sign( 'HMAC', calculated_key, data );
  const signature_string = base64FromArrayBuffer( signature_bytes );

  const token = `SharedAccessSignature sr=${encoded_uri}&sig=${encodeURIComponent(signature_string)}&se=${ttl}&skn=${name}`;
  return [ true, token ];
}
We use this token as the Authorization header when we POST to our event hubs URI, JSON encoding a message that our kafka processor understands.
Success!
We’ve now successfully gone through all five stages of the ingest process, almost completely within the worker, at the edge. Even if our API is down, events are not dropped. In an ideal world, this never happens, but paranoia is beneficial when building complex, high-scale systems.
Downsides
The greatest downside to this approach is complexity. It makes the system more complex, and duplicates efforts. For example, when implementing a new ingest format, we need to ensure it’s accomplishable within the worker. When we added API key level permissions, we had to ensure && parsed_db_res[0].permissions.indexOf(1)>-1 was added, in addition to a transient check for migrations.
Originally the idea was to only ingest data via the worker, so the addition of the “fast path” to the API was actually added after the fact. When performance wasn’t ideal, I shifted the majority of the workload to the API layer, but realized the power the Worker offered for “overflow.”
The future?
There are numerous ways to make data ingest at the edge even more resilient and performant. Cloudflare has a queues product in beta, which could itself be a fallback for Azure outages. They also have their D1 database, which could open up other interesting paths for secondary data storage. However, right now it feels like we’ve struck the right balance between reliability, cost and performance. We’ve load tested the bejezzus out of data ingest without problems. The worker code has direct overrides for our end-to-end integration tests to ensure new behavior changes are accounted for.
A note on Worker Secrets
Aggregations.io utilizes Pulumi to provision and manage infrastructure as code (C# code, to be specific). It provisions resources in AWS, Azure, Cloudflare & Stripe. Unfortunately there’s no Pulumi provider for Planetscale, but we’re still able to securely retrieve and process requisite secrets, without much copy-pasting. Additionally, secrets required for salting API Keys and decoding ingest IDs are bound to our worker via Pulumi. We will explore our Pulumi setup in a future blog post!